#Learn CSS Prefixing
Explore tagged Tumblr posts
Visit Tumblr Blog
Explore Tumblr blogs with no restrictions, modern design and the best experience.
Last Seen Tumblr Blogs


Fun Fact
In 2020, 44% of users from Denmark used Tumblr daily.
Text
Advanced CSS Techniques and Best Practices - A Comprehensive Guide by WebTutor.dev

Cascading Style Sheets (CSS) plays a crucial role in web development, allowing developers to bring life and style to their web pages. If you are looking to take your CSS skills to the next level, you're in the right place! In this advanced blog post, we will delve into the world of CSS, focusing on the comprehensive guide provided by Webtutor.dev in their CSS Introduction tutorial. Get ready to enhance your CSS knowledge and discover advanced techniques and best practices.
Optimizing CSS Performance: Techniques and Tools
Efficient CSS code is essential for maintaining fast-loading web pages. We'll explore advanced techniques to optimize CSS performance, such as minimizing file size, reducing render-blocking CSS, and utilizing CSS preprocessors. The Webtutor.dev guide will provide insights into performance optimization strategies and recommend helpful tools.
CSS Layouts: Flexbox and Grid
Modern CSS layout techniques, namely Flexbox and Grid, have revolutionized web design. We'll dive deep into these powerful tools, exploring their features, properties, and best use cases. The Webtutor.dev guide will offer practical examples and tutorials to help you master the art of creating flexible and responsive layouts.
Advanced Selectors and Pseudo-classes
CSS selectors allow you to target specific elements on a web page. We'll go beyond the basics and explore advanced selectors, including attribute selectors, sibling combinators, and pseudo-classes. The blog will highlight real-world scenarios where these selectors shine, enabling you to create targeted and dynamic styles.
CSS Transitions and Animations
Adding subtle animations and transitions can greatly enhance the user experience. We'll delve into CSS transitions and animations, covering advanced techniques such as keyframes, timing functions, and complex animations. The Webtutor.dev guide will provide practical examples and tips for creating smooth and visually appealing animations.
Customizing and Styling Form Elements
Forms are an integral part of web applications, and customizing their appearance can greatly improve usability and aesthetics. We'll explore advanced techniques for styling form elements using CSS, including styling checkboxes, radio buttons, dropdowns, and input fields. The blog will showcase creative examples and provide guidance for cross-browser compatibility.
Responsive Design: Advanced Media Queries and Breakpoints
Responsive design is essential for creating websites that adapt to different screen sizes. We'll dive into advanced media queries and breakpoints, enabling you to design fluid and responsive layouts for a variety of devices. The Webtutor.dev guide will offer tips for managing complex layouts and provide examples of responsive design patterns.
Cross-browser Compatibility and CSS Prefixing
Ensuring consistent rendering across different web browsers can be a challenge. We'll discuss advanced techniques for achieving cross-browser compatibility, including CSS prefixing, vendor-specific properties, and polyfills. The blog will provide insights into browser support tables and strategies to handle browser-specific quirks.
Conclusion
As we conclude our exploration of advanced CSS techniques and best practices with the guidance of Webtutor.dev's CSS Introduction guide, you're now equipped with the knowledge to take your CSS skills to new heights. Remember to experiment, practice, and stay updated with emerging CSS trends and techniques. With the expertise gained from this comprehensive guide, you'll be able to create stunning, performant, and responsive web designs. Happy coding!
#Learn Code for Free#Learn CSS Online#Free Online CSS Tutorial#Css Online Tutorial#CSS Introduction tutorial#Advanced CSS Techniques#CSS trends and techniques#Learn CSS selectors#Learn CSS Layouts#Modern CSS layout#Learn CSS Prefixing#Styling Form Elements#CSS elements online tutorial#CSS elements tutorial for beginners#CSS elements for web developers#CSS tags and elements#Learn CSS elements#CSS elements for web development tutorial#Basic CSS elements#CSS elements for beginners#CSS elements for websites
1 note
·
View note
Text
One of Those “Onboarding” UIs, With Anchor Positioning
New Post has been published on https://thedigitalinsider.com/one-of-those-onboarding-uis-with-anchor-positioning/
One of Those “Onboarding” UIs, With Anchor Positioning
Welcome to “Anchor Positioning 101” where we will be exploring this interesting new CSS feature. Our textbook for this class will be the extensive “Anchor Positioning Guide” that Juan Diego Rodriguez published here on CSS-Tricks.
I’m excited for this one. Some of you may remember when CSS-Tricks released the “Flexbox Layout Guide” or the “Grid Layout Guide” — I certainly do and still have them both bookmarked! I spend a lot of time flipping between tabs to make sure I have the right syntax in my “experimental” CodePens.
I’ve been experimenting with CSS anchor positioning like the “good old days” since Juan published his guide, so I figured it’d be fun to share some of the excitement, learn a bit, experiment, and of course: build stuff!
CSS Anchor Positioning introduction
Anchor positioning lets us attach — or “anchor” — one element to one or more other elements. More than that, it allows us to define how a “target” element (that’s what we call the element we’re attaching to an anchor element) is positioned next to the anchor-positioned element, including fallback positioning in the form of a new @position-try at-rule.
The most hand-wavy way to explain the benefits of anchor positioning is to think of it as a powerful enhancement to position: absolute; as it helps absolutely-positioned elements do what you expect. Don’t worry, we’ll see how this works as we go.
Anchor positioning is currently a W3C draft spec, so you know it’s fresh. It’s marked as “limited availability” in Baseline which at the time of writing means it is limited to Chromium-based browsers (versions 125+). That said, the considerate folks over at Oddbird have a polyfill available that’ll help out other browsers until they ship support.
This browser support data is from Caniuse, which has more detail. A number indicates that browser supports the feature at that version and up.
Desktop
Chrome Firefox IE Edge Safari 125 No No 125 No
Mobile / Tablet
Android Chrome Android Firefox Android iOS Safari 131 No 131 No
Oddbird contributes polyfills for many new CSS features and you (yes, you!) can support their work on Github or Open Collective!
Tab Atkins-Bittner, contributing author to the W3C draft spec on anchor positioning, spoke on the topic at CSS Day 2024. The full conference talk is available on YouTube:
Here at CSS-Tricks, Juan demonstrated how to mix and match anchor positioning with view-driven animations for an awesome floating notes effect:
Front-end friend Kevin Powell recently released a video demonstrating how “CSS Popover + Anchor Positioning is Magical”.
And finally, in the tradition of “making fun games to learn CSS,” Thomas Park released Anchoreum (a “Flexbox Froggy“-type game) to learn about CSS anchor positioning. Highly recommend checking this out to get the hang of the position-area property!
The homework
OK, now that we’re caught up on what CSS anchor positioning is and the excitement surrounding it, let’s talk about what it does. Tethering an element to another element? That has a lot of potential. Quite a few instances I can remember where I’ve had to fight with absolute positioning and z-index in order to get something positioned just right.
Let’s take a quick look at the basic syntax. First, we need two elements, an anchor-positioned element and the target element that will be tethered to it.
<!-- Anchor element --> <div id="anchor"> Anchor </div> <!-- Target element --> <div id="target"> Target </div>
We set an element as an anchor-positioned element by providing it with an anchor-name. This is a unique name of our choosing, however it needs the double-dash prefix, like CSS custom properties.
#anchor anchor-name: --anchor;
As for our target element, we’ll need to set position: absolute; on it as well as tell the element what anchor to tether to. We do that with a new CSS property, position-anchor using a value that matches the anchor-name of our anchor-positioned element.
#anchor anchor-name: --anchor; #target position: absolute; position-anchor: --anchor;
May not look like it yet, but now our two elements are attached. We can set the actual positioning on the target element by providing a position-area. To position our target element, position-area creates an invisible 3×3 grid over the anchor-positioned element. Using positioning keywords, we can designate where the target element appears near the anchor-positioned element.
#target position: absolute; position-anchor: --anchor; position-area: top center;
Now we see that our target element is anchored to the top-center of our anchor-positioned element!
Anchoring pseudo-elements
While playing with anchor positioning, I noticed you can anchor pseudo-elements, just the same as any other element.
#anchor anchor-name: --anchor; &::before content: "Target"; position: absolute; position-anchor: --anchor; left: anchor(center); bottom: anchor(center);
Might be useful for adding design flourishes to elements or adding functionality as some sort of indicator.
Moving anchors
Another quick experiment was to see if we can move anchors. And it turns out this is possible!
Notice the use of anchor() functions instead of position-area to position the target element.
#target position: absolute; position-anchor: --anchor-one; top: anchor(bottom); left: anchor(left);
CSS anchor functions are an alternate way to position target elements based on the computed values of the anchor-positioned element itself. Here we are setting the target element’s top property value to match the anchor-positioned element’s bottom value. Similarly, we can set the target’s left property value to match the anchor-positioned element’s left value.
Hovering over the container element swaps the position-anchor from --anchor-one to --anchor-two.
.container:hover #target position-anchor: --anchor-two;
We are also able to set a transition as we position the target using top and left, which makes it swap smoothly between anchors.
Extra experimental
Along with being the first to release CSS anchor-positioning, the Chrome dev team recently released new pseudo-selectors related to the <details> and <summary> elements. The ::details-content pseudo-selector allows you to style the “hidden” part of the <details> element.
With this information, I thought: “can I anchor it?” and sure enough, you can!
Again, this is definitely not ready for prime-time, but it’s always fun to experiment!
Practical examinations
Let’s take this a bit further and tackle more practical challenges using CSS anchor positioning. Please keep in mind that all these examples are Chrome-only at the time of writing!
Tooltips
One of the most straightforward use cases for CSS anchor positioning is possibly a tooltip. Makes a lot of sense: hover over an icon and a label floats nearby to explain what the icon does. I didn’t quite want to make yet another tutorial on how to make a tooltip and luckily for me, Zell Liew recently wrote an article on tooltip best practices, so we can focus purely on anchor positioning and refer to Zell’s work for the semantics.
Now, let’s check out one of these tooltips:
<!-- ... -->; <li class="toolbar-item">; <button type="button" id="inbox-tool" aria-labelledby="inbox-label" class="tool"> <svg id="inbox-tool-icon"> <!-- SVG icon code ... --> </svg> </button> <div id="inbox-label" role="tooltip"> <p>Inbox</p> </div> </li> <!-- ... -->
The HTML is structured in a way where the tooltip element is a sibling of our anchor-positioned <button>, notice how it has the [aria-labelledby] attribute set to match the tooltip’s [id]. The tooltip itself is a generic <div>, semantically enhanced to become a tooltip with the [role="tooltip"] attribute. We can also use [role="tooltip"] as a semantic selector to add common styles to tooltips, including the tooltip’s positioning relative to its anchor.
First, let’s turn our button into an anchored element by giving it an anchor-name. Next, we can set the target element’s position-anchor to match the anchor-name of the anchored element. By default, we can set the tooltip’s visibility to hidden, then using CSS sibling selectors, if the target element receives hover or focus-visible, we can then swap the visibility to visible.
/* Anchor-positioned Element */ #inbox-tool anchor-name: --inbox-tool; /* Target element */ [role="tooltip"]#inbox-label position-anchor: --inbox-tool /* Target positioning */ [role="tooltip"] position: absolute; position-area: end center; /* Hidden by default */ visibility: hidden; /* Visible when tool is hovered or receives focus */ .tool:hover + [role="tooltip"], .tool:focus-visible + [role="tooltip"] visibility: visible;
Ta-da! Here we have a working, CSS anchor-positioned tooltip!
As users of touch devices aren’t able to hover over elements, you may want to explore toggletips instead!
Floating disclosures
Disclosures are another common component pattern that might be a perfect use case for anchor positioning. Disclosures are typically a component where interacting with a toggle will open and close a corresponding element. Think of the good ol’ <detail>/<summary> HTML element duo, for example.
Currently, if you are looking to create a disclosure-like component which floats over other portions of your user interface, you might be in for some JavaScript, absolute positioning, and z-index related troubles. Soon enough though, we’ll be able to combine CSS anchor positioning with another newer platform feature [popover] to create some incredibly straightforward (and semantically accurate) floating disclosure elements.
The Popover API provides a non-modal way to elevate elements to the top-layer, while also baking in some great functionality, such as light dismissals.
Zell also has more information on popovers, dialogs, and modality!
One of the more common patterns you might consider as a “floating disclosure”-type component is a dropdown menu. Here is the HTML we’ll work with:
<nav> <button id="anchor">Toggle</button> <ul id="target"> <li><a href="#">Link 1</a></li> <li><a href="#">Link 2</a></li> <li><a href="#">Link 3</a></li> </ul> </nav>
We can set our target element, in this case the <ul>, to be our popover element by adding the [popover] attribute.
To control the popover, let’s add the attribute [popoveraction="toggle"] to enable the button as a toggle, and point the [popovertarget] attribute to the [id] of our target element.
<nav> <button id="anchor" popoveraction="toggle" popovertarget="target"> Toggle </button> <ul id="target" popover> <li><a href="#">Link 1</a></li> <li><a href="#">Link 2</a></li> <li><a href="#">Link 3</a></li> </ul> </nav>
No JavaScript is necessary, and now we have a toggle-able [popover] disclosure element! The problem is that it’s still not tethered to the anchor-positioned element, let’s fix that in our CSS.
First, as this is a popover, let’s add a small bit of styling to remove the intrinsic margin popovers receive by default from browsers.
ul[popover] margin: 0;
Let’s turn our button into an anchor-positioned element by providing it with an anchor-name:
ul[popover] margin: 0; #anchor anchor-name: --toggle;
As for our target element, we can attach it to the anchor-positioned element by setting its position to absolute and the position-anchor to our anchor-positioned element’s anchor-name:
ul[popover] margin: 0; #anchor anchor-name: --toggle; #target position: absolute; position-anchor: --toggle;
We can also adjust the target’s positioning near the anchor-positioned element with the position-area property, similar to what we did with our tooltip.
ul[popover] margin: 0; #anchor anchor-name: --toggle; #target position: absolute; position-anchor: --toggle; position-area: bottom; width: anchor-size(width);
You may notice another CSS anchor function in here, anchor-size()! We can set the target’s width to match the width of the anchor-positioned element by using anchor-size(width).
There is one more neat thing we can apply here, fallback positioning! Let’s consider that maybe this dropdown menu might sometimes be located at the bottom of the viewport, either from scrolling or some other reason. We don’t really want it to overflow or cause any extra scrolling, but instead, swap to an alternate location that is visible to the user.
Anchor positioning makes this possible with the postion-try-fallbacks property, a way to provide an alternate location for the target element to display near an anchor-positioned element.
#target position: absolute; position-anchor: --toggle; position-area: bottom; postion-try-fallbacks: top; width: anchor-size(width);
To keep things simple for our demo, we can add the opposite value of the value of the postion-area property: top.
Shopping cart component
We know how to make a tooltip and a disclosure element, now let’s build upon what we’ve learned so far and create a neat, interactive shopping cart component.
Let’s think about how we want to mark this up. First, we’ll need a button with a shopping cart icon:
<button id="shopping-cart-toggle"> <svg id="shopping-cart-icon" /> <!-- SVG icon code ... --> </svg> </button>
We can already reuse what we learned with our tooltip styles to provide a functioning label for this toggle. Let’s add the class .tool to the button, then include a tooltip as our label.
<!-- Toggle --> <button id="shopping-cart-toggle" aria-labelledby="shopping-cart-label" class="tool"> <svg id="shopping-cart-icon" /> <!-- SVG icon code ... --> </svg> </button> <!-- Tooltip --> <div id="shopping-cart-label" role="tooltip" class="tooltip"> <p>Shopping Cart</p> </div>
We’ll need to specify our <button> is an anchor-positioned element in CSS with an anchor-name, which we can also set as the tooltip’s position-anchor value to match.
button#shopping-cart-toggle anchor-name: --shopping-cart-toggle; [role="tooltip"]#shopping-cart-label position-anchor: --shopping-cart-toggle;
Now we should have a nice-looking tooltip labeling our shopping cart button!
But wait, we want this thing to do more than that! Let’s turn it into a disclosure component that reveals a list of items inside the user’s cart. As we are looking to have a floating user-interface with a few actions included, we should consider a <dialog> element. However, we don’t necessarily want to be blocking background content, so we can opt for a non-modal dialog using the[popover] attribute again!
<!-- Toggle --> <button id="shopping-cart-toggle" aria-labelledby="shopping-cart-label" class="tool" popovertarget="shopping-cart" popoveraction="toggle"> <svg id="shopping-cart-icon" /> <!-- SVG icon code ... --> </svg> </button> <!-- Tooltip --> <div id="shopping-cart-label" role="tooltip" class="tooltip"> <p>Shopping Cart</p> </div> <!-- Shopping Cart --> <dialog id="shopping-cart" popover> <!-- Shopping cart template... --> <button popovertarget="shopping-cart" popoveraction="close"> Dismiss Cart </button> </dialog>
To control the popover, we’ve added [popovertarget="shopping-cart"] and [popoveraction="toggle"] to our anchor-positioned element and included a second button within the <dialog> that can also be used to close the dialog with [popoveraction="close"].
To anchor the shopping cart <dialog> to the toggle, we can set position-anchor and position-area:
#shopping-cart position-anchor: --shopping-cart; position-area: end center;
At this point, we should take a moment to realize that we have tethered two elements to the same anchor!
We won’t stop there, though. There is one more enhancement we can make to really show how helpful anchor positioning can be: Let’s add a notification badge to the element to describe how many items are inside the cart.
Let’s place the badge inside of our anchor-positioned element this time.
<!-- Toggle --> <button id="shopping-cart-toggle" aria-labelledby="shopping-cart-label" class="tool" popovertarget="shopping-cart" popoveraction="toggle"> <svg id="shopping-cart-icon" /> <!-- SVG icon code ... --> </svg> <!-- Notification Badge --> <div id="shopping-cart-badge" class="notification-badge"> 1 </div> </button> <!-- ... -->
We can improve our tooltip to include verbiage about how many items are in the cart:
<!-- Tooltip --> <div id="shopping-cart-label" role="tooltip"> <p>Shopping Cart</p> <p>(1 item in cart)</p> </div>
Now the accessible name of our anchor-positioned element will be read as Shopping Cart (1 item in cart), which helps provide context to assistive technologies like screen readers.
Let’s tether this notification badge to the same anchor as our tooltip and shopping cart <dialog>, we can do this by setting the position-anchor property of the badge to --shopping-cart-toggle:
#shopping-cart-badge position: absolute; position-anchor: --shopping-cart-toggle;
Let’s look at positioning. We don’t want it below or next to the anchor, we want it overlapping, so we can use CSS anchor functions to position it based on the anchor-positioned element’s dimensions.
#shopping-cart-badge position: absolute; position-anchor: --shopping-cart-toggle; bottom: anchor(center); left: anchor(center);
Here we are setting the bottom and left of the target element to match the anchor’s center. This places it in the upper-right corner of the SVG icon!
Folks, this means we have three elements anchored now. Isn’t that fantastic?
Combining things
To put these anchor-positioned elements into perspective, I’ve combined all the techniques we’ve learned so far into a more familiar setting:
Disclosure components, dropdown menus, tooltips (and toggletips!), as well as notification badges all made much simpler using CSS anchor positioning!
Final project
As a final project for myself (and to bring this whole thing around full-circle), I decided to try to build a CSS anchor-positioned-based onboarding tool. I’ve previously attempted to build a tool like this at work, which I called “HandHoldJS” and it… well, it didn’t go so great. I managed to have a lot of the core functionality working using JavaScript, but it meant keeping track of quite a lot of positions and lots of weird things kept happening!
Let’s see if we can do better with CSS anchor positioning.
Feel free to check out the code on CodePen! I went down quite a rabbit hole on this one, so I’ll provide a bit of a high-level overview here.
<hand-hold> is a native custom element that works entirely in the light DOM. It sort of falls into the category of an HTML web component, as it is mostly based on enabling its inner HTML. You can specify tour stops to any element on the page by adding [data-tour-stop] attributes with values in the order you want the tour to occur.
Inside the <hand-hold> element contains a <button> to start the tour, a <dialog> element to contain the tour information, <section> elements to separate content between tour stops, a fieldset[data-handhold-navigation] element which holds navigation radio buttons, as well as another <button> to end the tour.
Each <section> element corresponds to a tour stop with a matching [data-handhold-content] attribute applied. Using JavaScript, <hand-hold> dynamically updates tour stops to be anchor-positioned elements, which the <dialog> can attach itself (there is a sneaky pseudo-element attached to the anchor to highlight the tour stop element!).
Although the <dialog> element is attached via CSS anchor positioning, it also moves within the DOM to appear next to the anchor-position element in the accessibility tree. The (well-meaning) intention here is to help provide more context to those who may be navigating via assistive devices by figuring out which element the dialog is referring to. Believe me, though, this thing is far from perfect as an accessible user experience.
Also, since the <dialog> moves throughout the DOM, unfortunately, a simple CSS transition would not suffice. Another modern browser feature to the rescue yet again, as we can pass a DOM manipulation function into a View Transition, making the transitions feel smoother!
There is still quite a lot to test with this, so I would not recommend using <hand-hold> in a production setting. If for no other reason than browser support is quite limited at the moment!
This is just an experiment to see what I could cook up using CSS anchor positioning, I’m excited for the potential!
Class dismissed!
After seeing what CSS anchor positioning is capable of, I have suspicions that it may change a lot of the ways we write CSS, similar to the introduction of flexbox or grid.
I’m excited to see what other user interface patterns can be accomplished with anchor positioning, and I’m even more excited to see what the community will do with it once it’s more broadly available!
#2024#Accessibility#ADD#amp#anchor positioning#animations#API#aria#Article#Articles#attributes#author#background#badge#badges#browser#buttons#change#chrome#chromium#code#Collective#Community#conference#container#content#course#CSS#css-tricks#custom properties
0 notes
Text
Web Designing Course in Delhi.
https://picklesanimation.in/best-web-designing-institute-in-delhi/
Certainly! Here's a sample course outline for a web design course at Pickles Animation:
Course Title: Web Design Essentials
Week 1: Introduction to Web Design
Overview of web design principles
Evolution of the internet and web design
Understanding the role of a web designer
Introduction to HTML, CSS, and JavaScript
Overview of popular web design tools and software
Week 2: HTML Fundamentals
Introduction to HTML5
Understanding the structure of HTML documents
Working with tags, attributes, and elements
Creating links, images, and basic forms
Semantic HTML and best practices
Week 3: CSS Fundamentals
Introduction to CSS3
Basic CSS syntax and selectors
Working with color, typography, and backgrounds
Box model and layout techniques
Responsive design principles
Week 4: Advanced CSS
CSS positioning and layout techniques
Flexbox and CSS Grid
CSS transitions and animations
Introduction to CSS preprocessors (e.g., SASS)
Cross-browser compatibility and vendor prefixes
Week 5: Introduction to JavaScript
Basics of JavaScript programming
Working with variables, data types, and operators
Control flow and conditional statements
Functions and scope
Introduction to DOM manipulation
Week 6: Responsive Web Design
Principles of responsive design
Media queries and breakpoints
Creating fluid layouts
Adaptive vs. responsive design strategies
Testing and debugging for different devices
Week 7: Web Typography
Typography principles for the web
Choosing and pairing web fonts
Implementing custom fonts
Enhancing readability and accessibility
Typography trends in modern web design
Week 8: User Experience (UX) Design
Understanding user experience design principles
Conducting user research and analysis
Creating user personas and user journeys
Wireframing and prototyping tools and techniques
Usability testing and iteration
Week 9: Introduction to Web Design Frameworks and Libraries
Overview of popular CSS frameworks (e.g., Bootstrap, Foundation)
Introduction to front-end JavaScript frameworks (e.g., React, Vue.js)
Using pre-built components and templates
Pros and cons of using frameworks and libraries
Week 10: Web Design Portfolio Development
Crafting a web design portfolio
Showcasing projects and case studies
Building an online portfolio website
Resume and cover letter writing tips for web designers
Strategies for networking and finding job opportunities in web design
Final Project: Students will work on a final web design project that incorporates concepts learned throughout the course. This project will be presented to the class and will contribute to their portfolio.

Throughout the course, students will engage in hands-on projects, exercises, and critiques to reinforce their understanding of web design principles and techniques. Additionally, guest speakers from the industry may be invited to provide insights into real-world applications of web design.
0 notes
Text
A Clear Guide to Ensuring Cross-Browser Compatibility in Front-End Development
Making sure your website or application functions properly across many browsers is a major responsibility when it comes to front-end development. Because people use different browsers to access the web, such as Chrome, Firefox, Safari, and Edge, it is important to achieve cross-browser compatibility. This blog article will discuss five useful strategies to guarantee a seamless and consistent user experience across various browsers.

1. Test Frequently and Early: When it comes to cross-browser compatibility, testing is your best friend. Early in the development phase, begin testing your code, and keep testing as you make changes. Check how your site appears and functions across a variety of browsers, rather than depending solely on your preferred one. It is easier to find and repair bugs when using tools that replicate diverse browser conditions, such as Sauce Labs or BrowserStack.
2. When using CSS, use vendor prefixes
Different browsers may respond differently to CSS attributes. Use vendor prefixes to ensure that your styles are correctly parsed in order to remedy this. Include prefixes like `-webkit-} for WebKit browsers (Chrome, Safari), `-moz-} for Firefox, and so on if you're using a border-radius property, for instance.
'''css .example { -webkit-border-radius: 5px; -moz-border-radius: 5px; border-radius: 5px;} '''
3. Implement feature detection:
Modernizr is a useful tool for this. It enables you to verify whether a given feature is supported by a specific browser before using it. By doing this, you can make sure that users have a more seamless experience across the board by gracefully downgrading your code for browsers that lack specific functionality.
4. Use JavaScript polyfills:
Not all browsers support all JavaScript capabilities equally. Now for the fun part: polyfills are little pieces of code that fill in the gaps in browsers that don't support specific functionalities. You can avoid potential compatibility issues by using services like Polyfill.io, which can automatically supply the necessary polyfills based on the user's browser.
5. Keep up-to-date and stay informed. As browsers change, so too should your approach to compatibility. Observe trends in browser market share and make necessary updates to your supported browser list. Check popular browsers often for updates, and make necessary adjustments to your codebase to bring it up to date. By taking this proactive approach, you can make sure that your application or website always reflects the preferences of your users.
Making sure that all browsers work together shouldn't be a difficult undertaking. No matter the browser a user chooses, you can reduce compatibility concerns and provide a flawless experience by implementing these five useful guidelines into your front-end development approach. Don't forget to thoroughly test, keep up with browser upgrades, and use any tools or tricks that will help streamline the process. Have fun with coding!
The Full Stack Developer course in Hyderabad is a great place to start if you're interested in learning more about full-stack developers because it provides opportunities for certification and job placement. Skilled educators can improve your learning. These services are available both offline and online. Take it step by step, and if you're interested, think about signing up for a course.
Thank you for spending your valuable time, and have a great day.
0 notes
Text
Dive into the concept of CSS-in-JS and its advantages for styling in front-end development.

CSS-in-JS is a methodology for styling web applications where CSS is written in JavaScript. It allows developers to define and apply styles directly in their JavaScript code, providing several advantages for styling in front-end development. If you're interested in learning more about front-end development, Learnnowx's front-end development course can be a valuable resource. Let's explore the concept of CSS-in-JS and its advantages:
Encapsulation: CSS-in-JS enables component-level styling by encapsulating styles within the JavaScript code of individual components. This approach avoids global style pollution and ensures that styles only apply to the intended components, reducing the chances of naming conflicts and unintended style inheritance.
Component-Based Development: CSS-in-JS aligns well with component-based development methodologies like React or Vue.js. Styles can be written directly alongside the component's logic, making it easier to understand and maintain the codebase. This approach promotes better organization and modularity.
Dynamic Styling: With CSS-in-JS, styles can be dynamically generated and modified based on the application's state or user interactions. This flexibility allows for responsive designs, theming, and conditional styling based on runtime data, enhancing the interactivity and user experience of web applications.
Reusability and Composition: CSS-in-JS allows for the creation of reusable style components that can be shared and composed across different parts of the application. This promotes code reusability, reduces duplication, and simplifies the process of creating consistent and cohesive UIs.
Scoped Styles: CSS-in-JS inherently provides scoped styles, meaning the styles defined within a component only apply to that specific component and its children. This eliminates the need for manual scoping techniques and minimizes the risk of style conflicts or unintended style overrides.
Performance Optimization: CSS-in-JS tools often include optimization features like automatic vendor prefixing, dead code elimination, and critical CSS extraction. These optimizations help reduce the size of the final CSS bundle, leading to improved page load times and performance.
By taking the LearNowX front-end developer course, you can dive deeper into the concept of CSS-in-JS and explore practical implementation techniques using popular CSS-in-JS libraries such as styled components, Emotion, or CSS Modules. The course can provide hands-on exercises and real-world examples to enhance your understanding and proficiency in front-end development, including modern styling approaches.
As the front-end development landscape evolves, CSS-in-JS has gained popularity for its advantages in component-based development, dynamic styling, code encapsulation, and reusability. Learning about CSS-in-JS can expand your skill set and enable you to create more efficient and maintainable front-end code.
0 notes
Text
A Complete Guide to CSS Media Queries by Andrés Galante (From CSS Tricks)
In lecture 7 we looked at Responsive Web Design and media queries, since then I have done a good bit of my own research into media queries to understand how they work better. This is an article that I came across by CSS Tricks that I found to be very helpful on this topic.
From reading this article I learned that media queries can be used to modify not only the appearance of a website or an app but also their behaviour too. These changes are made based off of a matched set of conditions from the user’s device, their browser or their system settings.
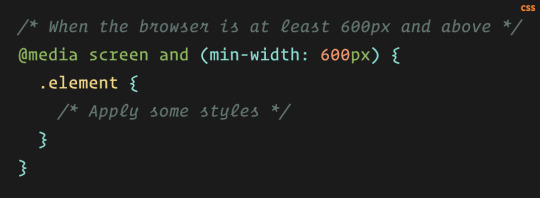
One of the most popular types of media query used around the world today are ones that target particular viewport ranges and that apply custom styles.
There are many other elements that can be targeted besides the viewport width such as the screen resolution, device orientation and operating system preferences and so on.
Media queries are primarily associated with CSS but they can also be used in HTML and JavaScript as well.
See below the anatomy of a Media Query:
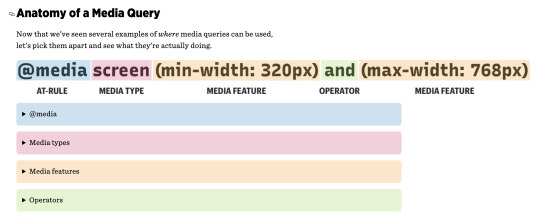
The min and max values:
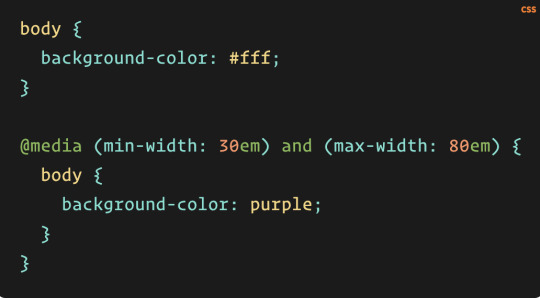
Media features such as width, height, color and color-index can be prefixed with min- or max- to define minimum and maximum constraints. A web developer can create a range of value to match with instead of declaring specific values.
The article goes on to further discuss media query features centred around accessibility, the prefers-contrast feature, inverted-colors, prefers-color-scheme and container queries.
The URL Link To This Website:
https://css-tricks.com/a-complete-guide-to-css-media-queries/
#media query#css media queries#media queries#appearance#device#browser#system settings#device size#screen size#responsiveness#responsive web design#viewport ranges#viewport settings#html#css#javascript#min-width#max-width#css toolbox#css tricks#accessibility#accessibility for everyone#150 different browsers#universal design is hard#different smartphone types#nesting#browser support#container queries#complete guide#does what it says on the tin
2 notes
·
View notes
Photo

hydralisk98′s web projects tracker:
Core principles=
Fail faster
‘Learn, Tweak, Make’ loop
This is meant to be a quick reference for tracking progress made over my various projects, organized by their “ultimate target” goal:
(START)
(Website)=
Install Firefox
Install Chrome
Install Microsoft newest browser
Install Lynx
Learn about contemporary web browsers
Install a very basic text editor
Install Notepad++
Install Nano
Install Powershell
Install Bash
Install Git
Learn HTML
Elements and attributes
Commenting (single line comment, multi-line comment)
Head (title, meta, charset, language, link, style, description, keywords, author, viewport, script, base, url-encode, )
Hyperlinks (local, external, link titles, relative filepaths, absolute filepaths)
Headings (h1-h6, horizontal rules)
Paragraphs (pre, line breaks)
Text formatting (bold, italic, deleted, inserted, subscript, superscript, marked)
Quotations (quote, blockquote, abbreviations, address, cite, bidirectional override)
Entities & symbols (&entity_name, &entity_number,  , useful HTML character entities, diacritical marks, mathematical symbols, greek letters, currency symbols, )
Id (bookmarks)
Classes (select elements, multiple classes, different tags can share same class, )
Blocks & Inlines (div, span)
Computercode (kbd, samp, code, var)
Lists (ordered, unordered, description lists, control list counting, nesting)
Tables (colspan, rowspan, caption, colgroup, thead, tbody, tfoot, th)
Images (src, alt, width, height, animated, link, map, area, usenmap, , picture, picture for format support)
old fashioned audio
old fashioned video
Iframes (URL src, name, target)
Forms (input types, action, method, GET, POST, name, fieldset, accept-charset, autocomplete, enctype, novalidate, target, form elements, input attributes)
URL encode (scheme, prefix, domain, port, path, filename, ascii-encodings)
Learn about oldest web browsers onwards
Learn early HTML versions (doctypes & permitted elements for each version)
Make a 90s-like web page compatible with as much early web formats as possible, earliest web browsers’ compatibility is best here
Learn how to teach HTML5 features to most if not all older browsers
Install Adobe XD
Register a account at Figma
Learn Adobe XD basics
Learn Figma basics
Install Microsoft’s VS Code
Install my Microsoft’s VS Code favorite extensions
Learn HTML5
Semantic elements
Layouts
Graphics (SVG, canvas)
Track
Audio
Video
Embed
APIs (geolocation, drag and drop, local storage, application cache, web workers, server-sent events, )
HTMLShiv for teaching older browsers HTML5
HTML5 style guide and coding conventions (doctype, clean tidy well-formed code, lower case element names, close all html elements, close empty html elements, quote attribute values, image attributes, space and equal signs, avoid long code lines, blank lines, indentation, keep html, keep head, keep body, meta data, viewport, comments, stylesheets, loading JS into html, accessing HTML elements with JS, use lowercase file names, file extensions, index/default)
Learn CSS
Selections
Colors
Fonts
Positioning
Box model
Grid
Flexbox
Custom properties
Transitions
Animate
Make a simple modern static site
Learn responsive design
Viewport
Media queries
Fluid widths
rem units over px
Mobile first
Learn SASS
Variables
Nesting
Conditionals
Functions
Learn about CSS frameworks
Learn Bootstrap
Learn Tailwind CSS
Learn JS
Fundamentals
Document Object Model / DOM
JavaScript Object Notation / JSON
Fetch API
Modern JS (ES6+)
Learn Git
Learn Browser Dev Tools
Learn your VS Code extensions
Learn Emmet
Learn NPM
Learn Yarn
Learn Axios
Learn Webpack
Learn Parcel
Learn basic deployment
Domain registration (Namecheap)
Managed hosting (InMotion, Hostgator, Bluehost)
Static hosting (Nertlify, Github Pages)
SSL certificate
FTP
SFTP
SSH
CLI
Make a fancy front end website about
Make a few Tumblr themes
===You are now a basic front end developer!
Learn about XML dialects
Learn XML
Learn about JS frameworks
Learn jQuery
Learn React
Contex API with Hooks
NEXT
Learn Vue.js
Vuex
NUXT
Learn Svelte
NUXT (Vue)
Learn Gatsby
Learn Gridsome
Learn Typescript
Make a epic front end website about
===You are now a front-end wizard!
Learn Node.js
Express
Nest.js
Koa
Learn Python
Django
Flask
Learn GoLang
Revel
Learn PHP
Laravel
Slim
Symfony
Learn Ruby
Ruby on Rails
Sinatra
Learn SQL
PostgreSQL
MySQL
Learn ORM
Learn ODM
Learn NoSQL
MongoDB
RethinkDB
CouchDB
Learn a cloud database
Firebase, Azure Cloud DB, AWS
Learn a lightweight & cache variant
Redis
SQLlite
NeDB
Learn GraphQL
Learn about CMSes
Learn Wordpress
Learn Drupal
Learn Keystone
Learn Enduro
Learn Contentful
Learn Sanity
Learn Jekyll
Learn about DevOps
Learn NGINX
Learn Apache
Learn Linode
Learn Heroku
Learn Azure
Learn Docker
Learn testing
Learn load balancing
===You are now a good full stack developer
Learn about mobile development
Learn Dart
Learn Flutter
Learn React Native
Learn Nativescript
Learn Ionic
Learn progressive web apps
Learn Electron
Learn JAMstack
Learn serverless architecture
Learn API-first design
Learn data science
Learn machine learning
Learn deep learning
Learn speech recognition
Learn web assembly
===You are now a epic full stack developer
Make a web browser
Make a web server
===You are now a legendary full stack developer
[...]
(Computer system)=
Learn to execute and test your code in a command line interface
Learn to use breakpoints and debuggers
Learn Bash
Learn fish
Learn Zsh
Learn Vim
Learn nano
Learn Notepad++
Learn VS Code
Learn Brackets
Learn Atom
Learn Geany
Learn Neovim
Learn Python
Learn Java?
Learn R
Learn Swift?
Learn Go-lang?
Learn Common Lisp
Learn Clojure (& ClojureScript)
Learn Scheme
Learn C++
Learn C
Learn B
Learn Mesa
Learn Brainfuck
Learn Assembly
Learn Machine Code
Learn how to manage I/O
Make a keypad
Make a keyboard
Make a mouse
Make a light pen
Make a small LCD display
Make a small LED display
Make a teleprinter terminal
Make a medium raster CRT display
Make a small vector CRT display
Make larger LED displays
Make a few CRT displays
Learn how to manage computer memory
Make datasettes
Make a datasette deck
Make floppy disks
Make a floppy drive
Learn how to control data
Learn binary base
Learn hexadecimal base
Learn octal base
Learn registers
Learn timing information
Learn assembly common mnemonics
Learn arithmetic operations
Learn logic operations (AND, OR, XOR, NOT, NAND, NOR, NXOR, IMPLY)
Learn masking
Learn assembly language basics
Learn stack construct’s operations
Learn calling conventions
Learn to use Application Binary Interface or ABI
Learn to make your own ABIs
Learn to use memory maps
Learn to make memory maps
Make a clock
Make a front panel
Make a calculator
Learn about existing instruction sets (Intel, ARM, RISC-V, PIC, AVR, SPARC, MIPS, Intersil 6120, Z80...)
Design a instruction set
Compose a assembler
Compose a disassembler
Compose a emulator
Write a B-derivative programming language (somewhat similar to C)
Write a IPL-derivative programming language (somewhat similar to Lisp and Scheme)
Write a general markup language (like GML, SGML, HTML, XML...)
Write a Turing tarpit (like Brainfuck)
Write a scripting language (like Bash)
Write a database system (like VisiCalc or SQL)
Write a CLI shell (basic operating system like Unix or CP/M)
Write a single-user GUI operating system (like Xerox Star’s Pilot)
Write a multi-user GUI operating system (like Linux)
Write various software utilities for my various OSes
Write various games for my various OSes
Write various niche applications for my various OSes
Implement a awesome model in very large scale integration, like the Commodore CBM-II
Implement a epic model in integrated circuits, like the DEC PDP-15
Implement a modest model in transistor-transistor logic, similar to the DEC PDP-12
Implement a simple model in diode-transistor logic, like the original DEC PDP-8
Implement a simpler model in later vacuum tubes, like the IBM 700 series
Implement simplest model in early vacuum tubes, like the EDSAC
[...]
(Conlang)=
Choose sounds
Choose phonotactics
[...]
(Animation ‘movie’)=
[...]
(Exploration top-down ’racing game’)=
[...]
(Video dictionary)=
[...]
(Grand strategy game)=
[...]
(Telex system)=
[...]
(Pen&paper tabletop game)=
[...]
(Search engine)=
[...]
(Microlearning system)=
[...]
(Alternate planet)=
[...]
(END)
4 notes
·
View notes
Text
Some Advanced HTML Tags and Techniques: Take Your Web Design Skills to the Next Level

HTML (Hypertext Markup Language) is the standard markup language used for creating web pages. It allows you to structure content and define its meaning, layout, and appearance on a web page. Here are some advanced HTML tags and techniques that can help you create more dynamic and interactive web pages.
HTML Head
The HTML head element contains information about the document, such as the page title, meta information, and links to external resources. The head element is included in the HTML file before the body element and is not visible on the page. It is used to provide information that the browser or search engine can use to better understand and display the document. Some common elements found in the head include the title tag, meta tags for SEO, links to stylesheets, and references to JavaScript files. By including the appropriate information in the head element, you can help to improve the user experience and search engine optimization of your web pages.
Learn More About HTML Head
HTML Color
HTML color is an important aspect of web design, and learning to use color codes effectively can enhance the visual appeal of a web page or website. HTML color codes can be used with various HTML elements, such as <body>, <div>, <h1>, <p>, and <a>, to name a few. They can also be used in CSS code to style elements within a page or an entire website.
Learn More About HTML Color
Semantic HTML
Semantic HTML uses tags to describe the meaning and structure of content, rather than just its appearance. This makes it easier for search engines and screen readers to understand the content of a web page. Examples of semantic tags include <header>, <main>, <nav>, <section>, and <article>.
Learn more about HTML Semantic
Custom Attributes
HTML allows you to create your own custom attributes for elements. This can be useful for storing additional data or metadata about an element, such as a data attribute for storing an ID or a tooltip. Custom attributes should be prefixed with "data-", such as data-id or data-tooltip.
Learn more about HTML Attributes
HTML Forms
HTML forms are used to collect user input and are a fundamental component of many web applications. Advanced form techniques include validation, using the required attribute, and customizing the appearance with CSS.
Learn more about HTML Forms
HTML5 Canvas
The HTML5 canvas elementallows you to create dynamic graphics and animations on a web page. With JavaScript, you can draw shapes, lines, text, and images, and animate them using various techniques.
Learn more about HTML Canvas
Responsive Images
Responsive images ensure that images are displayed at an appropriate size and resolution for the user's device and connection speed. HTML provides several ways to implement responsive images, including the srcset and sizes attributes, and the picture element.
Learn more about HTML Images
HTML Table
HTML tables are used to display data in a structured and organized manner. They consist of rows and columns, and each cell can contain text, images, links, or other HTML elements. To create a table, you use the <table> tag, and then add rows with the <tr> tag and cells with the <td> or <th> tag. The <th> tag is used for table headers. You can also add attributes such as "border", "cellspacing", and "cellpadding" to the <table> tag to adjust the appearance of the table. By using HTML tables, you can present data in a clear and readable format on your web page.
Learn more about HTML Table
HTML Class
HTML classes allow you to apply a specific style or behavior to a group of HTML elements. To create a class, you use the "class" attribute and assign a name to it, such as "my-class". You can then add this class to one or more HTML elements by using the "class" attribute followed by the class name, such as "class=my-class". This makes it easier to apply consistent styles across your website and to make changes to those styles by editing the class definition in your CSS stylesheet. Classes can also be used to target elements with JavaScript or jQuery, making it easier to manipulate their behavior and appearance. By using HTML classes, you can create a more flexible and maintainable website design.
Learn more about HTML Class
HTML JavaScript
HTML and JavaScript work together to create dynamic and interactive web pages. JavaScript is a programming language that can be embedded in HTML documents to add interactivity, animations, and other dynamic features. You can include JavaScript code in your HTML document using the <script> tag, either by including it directly in the HTML file or by referencing an external JavaScript file. JavaScript can interact with HTML elements, manipulate the DOM, and communicate with servers to dynamically update web content without requiring a page refresh. By using HTML and JavaScript together, you can create powerful and engaging web applications that run directly in the browser.
Learn more about HTML JavaScript
In conclusion
By utilizing advanced HTML tags and techniques, web developers can take their web design skills to the next level. From creating dynamic animations with the canvas element, to implementing responsive images and web components, these techniques allow for more interactive and user-friendly web experiences. Additionally, it is important to consider accessibility when designing web content, ensuring that all users can access and interact with the content. With these tools and techniques, web developers can create more engaging, accessible, and responsive web pages.
#Advanced HTML Tutorial#Online Tutorial for Web Designing#webtutor#learn advanced HTML and CSS#learn HTML Head#online HTML Head#learn HTML Color#HTML head Elements#HTML head tag#What is Html Head?#Head Tag in HTML#HTML Semantic Elements#What Is Semantic HTML#Semantic Tags in HTML#learn HTML Attributes#what is HTML Attributes?#HTML Forms#free learn HTML Forms#HTML5 Canvas#learn HTML5 Canvas#learn HTML Class#learn HTML Table#HTML JavaScript#Learn HTML JavaScript#Online HTML JavaScript
1 note
·
View note
Text
flex cheat sheet free H20T#
💾 ►►► DOWNLOAD FILE 🔥🔥🔥🔥🔥 This complete guide explains everything about flexbox, focusing on all the different possible properties for the parent element (the flex. A simple visual cheatsheet for CSS flexbox layout. CSS Flexbox Cheatsheet. Flexbox Container. Enables a flex container; inline or block. Flexbox Cheatsheet. Published on 22 Dec Last updated on on 09 Feb Created by @darek_kay. Flexbox cheatsheet . Contribute to yoksel/flex-cheatsheet development by creating an account on GitHub. 9 Watch a 3 minute video introduction with live demos you can view source on. The first step in any flexbox layout is to create a flex container. To do that, set the display property to flex. In Safari, you will still have to use the -webkit prefix. Watch a 3 minute video introduction to flexbox with live demos you can view source on. Flex items are the children of a flex container. They are positioned along a main axis and a cross axis. The main axis is horizontal by default, so the items flow into a row. You can flip the main axis by setting flex-direction to column , it's set to row by default. Watch a 3 minute video on flexbox containers with live demos you can view source on. How you move flex items to the top depends on the orientation of the main axis. If it's vertical, you set justify-content. If it's horizontal, you set align-items. Moving items to the left or right also depends on the orientation of the main axis. If flex-direction is set to row , then you set justify-content , otherwise if it's set to column you set align-items. Vertical and horizontal centering within a flexcontainer is trivial. Again, it depends on the orientation of the main axis, so whether flex-direction is set to row or column. You can define how an individual flex item grows and shrinks relative to other flex items in the container. To do this set the flex property on each flex item you want to grow or shrink. Watch a 3 minute video on how the flex items grow and shrink with interactive demos. Watch a 3 minute video on how flex-wrap property works with interactive demos. The align-content property gives you options for distributing the space around wrapped rows or columns. The options are flex-start, flex-end, space-between, space-around and stretch. To simply remove the space around wrapped columns, set align-content to center. Watch a 3 minute video on properties like align-content with interactive demos. You can control the align-items value for individual elements with align-self. You can also use margins to move individual elements up or down or left of right. Stop flailing with floats. Learn flexbox with these interactive videos. Table of Contents Create a flex container Put flex items in a row Put flex items into a column Move flex items to the top Move flex items to the left Move flex items to the right Center everything Grow a flex item X times as big as other flex items Wrap flex items into multiple rows Wrap flex items into multiple columns Remove the space from wrapped rows or columns Pin an element to one side of the flex container Other flexbox resources Create a flex container The first step in any flexbox layout is to create a flex container. No Prefixes Prefixes copy. Follow sfioritto Tweet. Take this free lesson on flexbox. Learn flexbox with these interactive videos Watch Lesson 1.
1 note
·
View note
Text
Responsive design tutorial 2015

RESPONSIVE DESIGN TUTORIAL 2015 HOW TO
RESPONSIVE DESIGN TUTORIAL 2015 FULL
RESPONSIVE DESIGN TUTORIAL 2015 SERIES
By specifying particular rules in the CSS stylesheet, you will be able to define how the various elements of a web page will be displayed on the device, in this case, depending on the orientation of the device we use. orientation - it sets a vertical or horizontal orientation.Even in this case, you can still use the min and max prefixes. device-width/height - These properties set the width and the height of the rendering surface, that is, the width and height of the entire screen of the device and not simply of the display area of the document.width / height - With these properties, you can set the width and height of the display area including any scroll bar.There are many more valid properties associated with media queries. Thinking about responsive web design, there is a tendency to focus exclusively on the width property, but there quite a few other attributes to consider when designing for a variety of screen sizes. It includes the function to be evaluated (in this case, the minimum width of the browser window) and the corresponding value to test that the rule has been applied (in this case, a value of 500px). ( min-width: 500px) - The second part is the query itself.You might recognize this syntax from writing your own CSS styles, especially if you used this method before when designing printing options for your website. media screen - The first part of a media query is the type of support.Media queries are composed of two main parts: Let’s start by getting our hands dirty with media queries they represent one the most important tools that a web designer has to make their website responsive and mobile-friendly. One of the foundations or responsive design is media queries, which ultimately make the site accessible and usable by the largest number of users, including those who do not use recent versions of popular browsers such as Internet Explorer, Mozilla Firefox, and Chrome.
RESPONSIVE DESIGN TUTORIAL 2015 HOW TO
You’ll see how to implement some rules related to responsive web design, by applying what we have analyzed conceptually in prior articles.
RESPONSIVE DESIGN TUTORIAL 2015 FULL
You’ll learn how to take full advantage of modern web technologies, namely HTML5 and CSS3, applying them step-by-step to each component of your web content.The mockup of the website won’t be unique to one platform, and it’ll provide an example of the possible structure of a portal from several standpoints-imagining the view on three different devices: smartphones, tablets, and desktop PCs. You’ll learn how to create a responsive design mockup, taking into account the main features of a website, the users’ needs, and the way to effectively combine responsive graphics and web design.Let’s start with defining the objectives of this new series, and highlight what you’ll learn. Now it’s time to demonstrate some real-world technical applications of the responsive web design and build a real responsive website. Finally, we’ve explored the problem of cross-browser compatibility and proposed different ways to achieve it. We’ve covered some common problems that a web designer may encounter when managing responsive images (and pointed out potential solutions). We’ve explored the characteristics of four different layout types and their respective fields of implementation. We have explored the various measurement options for fonts in a website, and we’ve covered the best way to approach typography in terms of responsive web design. We’ve seen that there are many aspects to take into consideration throughout the responsive design process: screen size, operating platform, user behavior, and so on. Now, let’s set the stage for a more concrete work.
RESPONSIVE DESIGN TUTORIAL 2015 SERIES
In the last series (“ Understanding Responsive Web Design“), I defined the basic features of this new and important responsive approach to mobile-friendly, device-agnostic design.
0 notes
Text
Reditr fullscreen

#Reditr fullscreen how to#
#Reditr fullscreen mac#
#Reditr fullscreen mac#
When trying to configure your Mac to automatically sleep, confusion often arises because the option isn’t spelled out in Energy Saver preferences. Earlier versions of macOS included two sliders in this preference pane: one to set when the display turns off, and one to set when the computer goes to sleep. At some point, Apple combined these sliders into one to encourage people to let their computers sleep by default, thereby theoretically helping to conserve energy.
#Reditr fullscreen how to#
Unfortunately, in more recent versions of macOS (such as macOS 10.15 Catalina), it is no longer immediately obvious how to get your Mac to sleep after a certain period of time.īut fear not we’ll sort it out. Set your Mac to Automatically Sleep After a Period of Time What you do next in Energy Saver preferences depends on whether you want your computer to sleep or not to sleep after a certain period of time. If you want your Mac to automatically go to sleep after a certain period of time, locate the slider labeled “Turn display off after” in Energy Saver preferences.ĭrag the slider to match your desired sleep time. Also, make sure that “Prevent computer from sleeping automatically when the display is off” option is not checked. #MAC SCREEN SAVER START AFTER NEVER MAC#Īfter the period of time you selected, the display will go dark, and the Mac should go into sleep mode soon afterward-unless something is holding up the process. How to Automatically Turn Off Your Mac’s Display without Sleeping In that case, see the section on troubleshooting below. #MAC SCREEN SAVER START AFTER NEVER HOW TO#
#MAC SCREEN SAVER START AFTER NEVER MAC#.
#MAC SCREEN SAVER START AFTER NEVER HOW TO#.
I decided to display the icon in the element using :after pseudo-element, so that later we can change the icon easily through CSS using the content attribute. Then, we place the image at the center of the window as well as add a few decorative styles to make it look nicer. We have a element to wrap the image and a element for the button. The idea is we will have an image and a button that will put the image fullscreen or change it back to normal view with a click. In this post, we will run a simple project. One of the best way to learn a new thing is by example. It is worth noting that the Fullscreen API is subject to change in the future. The method to whether the element is in fullscreen mode. The method to send the webpage or specified element fullscreen. Similar to CSS3, the syntax is prefixed as it is still in experimental stage. Recommended Reading: More HTML5 / CSS3 Tutorials Browser SupportĪt the time of the writing, this API only works for Google Chrome, Safari and Firefox. This API allows us to put our website or just a particular element on the webpage in fullscreen (and vice versa) using the browser’s native functionality.Īs far as implementation is concerned, this API would be useful particularly for videos, images, online game, and HTML/CSS-based slide presentations. In addition to providing several new elements, HTML5 also introduced a set of new APIs including one that we are going to discuss in this post, called Fullscreen API. However, there are times when we, as a web developer, want to add a trigger on the webpage to perform the function rather than use those keys. To do so, you can hit F11 key in Windows, while in OS X you can hit Shift + Command + F. We have always been able to view a whole webpage in fullscreen mode.
0 notes
Text
Web Design Will Make You Tons Of Cash. Here's How!
What is a CSS-Template? A CSS Template can be described as a stylesheet that follows a standard format. Ian Hickson's early work in XUL inspired the first ideas to describe templates. These ideas were revived again in 2005 by W3C's Device Independence Working Group. Dave Raggett, a 1996 CSS designer, proposed a design pattern that uses frames in order to display content in a certain area of html pages. CSS Templates are just one example of many styles you can use to create websites. A good CSS template should work with HTML5, HTML, CSS3, and CSS3. It should also be responsive. A good template must be SEO-friendly and easy to edit. It doesn't matter if you are using Wordpress or another CMS. You need to be careful about the licensing. If the CSS Template comes free, be sure to get an open-source license. If it doesn’t, you’ll have to develop your own design. A CSS Template also has a drawback: you must be capable of changing it. The CSS Template is a great learning tool but doesn't come with an intuitive interface. This makes CSS templates ideal to those new to web design. A template could also be used in future projects. CSS templates are intended to be used as a work-in progress. They may not have all the capabilities or style of a fully functioning website. Grid' templates are useful for creating more complicated layouts. They allow you to make grids with rows and columns. If you wish to have the elements of a grid appear as one unit, create another grid. This allows you to add more information into the column. Make a list and then display it all on one screen. After that, you can insert content to the area. The W3C Template Layout module specification requires that a free CSS Template be compatible. This script should work in all major browsers. The script will fail if you are using a Post request. Instead, use the GET question. This script will use the prefix of your browser by default. A slot for skills or reference can often be added. Online, you can download a free CSS-template. It can be used as a portfolio showcase on your site. You can modify it and make any improvements you want. A good CSS Template free of charge should be editable. It should not be only free but also compatible using the most recent web standards. You should be able modify the theme to meet your business needs. Once you've made any adjustments to the theme, your site can be launched and you can start to get new clients. CSS Templates come in handy when you want to create websites for specific purposes. Hepta is an example of a template that travel websites use. It is compatible across all browsers, contains many images, and can be modified easily. It's a great choice for people who want to have a professional online presence. There are many CSS templates that you can choose from, but it's worth looking at multiple options. You can also save time with free CSS templates. The W3C offers templates that you can use to create a template. You will be able to design templates that match your needs. You can also download the premium version of this template for your site. Each version has its unique advantages. It's worth checking them all. A CSS Template is a great choice for your website. This template is free and works on both mobile and desktop devices. A CSS template can help you style a website even though you don't know much about code. A CSS template works well for simple web pages. For this, you can use a CSS template. You could also use it in order to create more advanced templates. HTML5 framework can be used in a variety applications and is therefore the best choice when it comes to developing websites.
0 notes
Text
The Death Of Website Building.
What is a CSS Template? A CSS Template is a stylesheet with a consistent layout. The first ideas for the description and use of templates were inspired by Ian Hickson's early work with XUL. These ideas were revived by the W3C's Device Independence Working Group in 2005. Dave Raggett suggested a CSS design pattern in 1996 that used frames to display content within a specific area of the webpage. The CSS Template is one style that can be used to create websites. A great CSS template must be compatible with HTML5, HTML3, and CSS3 and should have responsive design. Good templates should be easy to modify and SEO-friendly. You must be aware of the licensing, regardless of whether you use Wordpress or another CMS. Make sure the CSS Template you get is free and comes with an open-source licence. If it does not, you will need to create a custom design. Another drawback to a CSS Template is the fact that you have to be able to modify it. It's an excellent learning tool, but it doesn't have an intuitive interface. This makes CSS templates great for beginners in web design. You could reuse the same template for future projects. You should remember that CSS templates can be used for future projects. They may not have the same design or functionality as fully functional sites. You can create more complex layouts by using a grid' template. This allows you to create grids made up of columns and rows. If you want the grid's elements to appear as one element, create another grid. This allows you to add more information to the columns. You can display all of the items on one screen by creating a list in a spreadsheet. You can then insert the content into that area. The W3C Template Layout Modification specification should be used to create a free CSS Template. This script should work with all major browsers. It only requires the GET request. The script won't work if you use a POST request. You should instead use the GET query. This script will default use your browser's prefix. You can include a slot to store skills or references. You can download a free CSS template online. This template can be used to display your portfolio on your website. It can be modified and improved as often as you like. A good CSS Template should be easily customizable. It should not only be free but also compatible with all the latest web standards. You should be able to modify the theme to fit your business' needs. After you have made any changes to the theme you can launch your website and start to attract new clients. CSS Templates can be very useful when creating websites for specific purposes. Hepta is one example of a template used by travel websites. It works with all browsers and includes many images. You can also modify it easily. This is an excellent choice for anyone looking to establish an online presence with a professional, clean look. Although there are many CSS templates available, it is worth exploring multiple options. Free CSS templates can help you save time and money. Use the W3C's templates to create a template. The W3C templates will allow you to create templates that fit your needs. A premium version can be downloaded to your website. Each template has its own advantages and each one is worth looking at. A CSS Template is an excellent alternative to your website. This template is completely free and can be used on desktop or mobile devices. Even if you don’t know any code, a CSS template can be used to design a website. A CSS template is perfect for a basic web page. It can be used as a CSS file. It can also be used to create advanced templates. HTML5 Framework is the best choice for building websites because it's flexible and can be used across a variety of applications.
0 notes
Text
Ten Lessons That Will Teach You All You Need To Know About Web Design.
What is a CSS template? A CSS Template refers to a stylesheet which has a standard layout. Ian Hickson’s early work on XUL led to the development of the first ideas for the descriptions of templates. These ideas were revived by W3C’s Device Independence Working Group (2005/). Dave Raggett in 1996 proposed a CSS design that uses frames to display content on a particular area of the web page. One of the many styles that are available today to build websites is the CSS Template. A responsive design and HTML5 compatibility are essential for a good CSS template. A great template should be SEO-friendly, and easy to modify. No matter if you're using Wordpress, a CMS or another CMS, you need to pay attention to licensing. If the CSS Template is available for free, ensure that it comes with an Open-Source License. If it doesn't, then you'll need to make your own design. The downside to using a CSS Template is that it must be possible to modify. Although it's a useful learning tool, the interface is not intuitive. This makes CSS templates perfect for newbies in web design. This template can be reused for future projects. CSS templates should be considered a work-in-progress and may not offer the same functionality or style as a fully functional site. A grid' template is a way to create complex layouts. It allows you the ability to combine columns and rows. You can create another grid if the elements of your grid are to be displayed as a single element. This means you can add additional information to the column. To illustrate, you could create a list of items in a spreadsheet. Then display them all on one screen. Next, insert the content. Free CSS Templates should conform to the W3C Template layout Module specification. This script must be compatible with major browsers. The script will not work if it receives a post request. Instead, you should use the GET request. This script will default to the browser's prefix. A slot can be included for skills and references. Download a free CSS Template online. You can use it on your website to show off your portfolio. You can make modifications and improvements as many times as you wish. A good CSS Template must be customizable. It should be not only free, but also compatible to the most current web standards. It should be adaptable enough to allow you to customize it for your business. After making any modifications to your theme, you are ready to launch your site and gain new clients. CSS Templates are a great way to create websites that serve a specific purpose. Hepta is a template most travel websites use. It's compatible with all browsers, has many images and is easy to customize. This template is great for creating an online presence with a professional and clean look. There are many CSS template options, but it is worth considering multiple options. You can also save money and time by using free CSS templates. You can create your own template by using templates from the W3C. This will enable you to design templates that suit your needs. To use the template on your website, you can download a premium copy. Each one has its advantages so it is well worth taking a look at them all. A CSS Template can be a great option for your website. It is available for free on both desktop and mobile devices. A CSS template is a great way to style your website, even if it doesn't have any programming skills. A CSS template can be used to create a simple website. A CSS file can be used for this purpose. You can also use it for creating more complex templates. HTML5 framework is flexible and easy to use in many applications. It is the best tool for creating websites.
0 notes
Text
Ten Common Myths About Web Design.
What is a CSS Template? A CSS Template is a stylesheet with a consistent layout. The first ideas for the description and use of templates were inspired by Ian Hickson's early work with XUL. These ideas were revived by the W3C's Device Independence Working Group in 2005. Dave Raggett suggested a CSS design pattern in 1996 that used frames to display content within a specific area of the webpage. The CSS Template is one style that can be used to create websites. A great CSS template must be compatible with HTML5, HTML3, and CSS3 and should have responsive design. Good templates should be easy to modify and SEO-friendly. You must be aware of the licensing, regardless of whether you use Wordpress or another CMS. Make sure the CSS Template you get is free and comes with an open-source licence. If it does not, you will need to create a custom design. Another drawback to a CSS Template is the fact that you have to be able to modify it. It's an excellent learning tool, but it doesn't have an intuitive interface. This makes CSS templates great for beginners in web design. You could reuse the same template for future projects. You should remember that CSS templates can be used for future projects. They may not have the same design or functionality as fully functional sites. You can create more complex layouts by using a grid' template. This allows you to create grids made up of columns and rows. If you want the grid's elements to appear as one element, create another grid. This allows you to add more information to the columns. You can display all of the items on one screen by creating a list in a spreadsheet. You can then insert the content into that area. The W3C Template Layout Modification specification should be used to create a free CSS Template. This script should work with all major browsers. It only requires the GET request. The script won't work if you use a POST request. You should instead use the GET query. This script will default use your browser's prefix. You can include a slot to store skills or references. You can download a free CSS template online. This template can be used to display your portfolio on your website. It can be modified and improved as often as you like. A good CSS Template should be easily customizable. It should not only be free but also compatible with all the latest web standards. You should be able to modify the theme to fit your business' needs. After you have made any changes to the theme you can launch your website and start to attract new clients. CSS Templates can be very useful when creating websites for specific purposes. Hepta is one example of a template used by travel websites. It works with all browsers and includes many images. You can also modify it easily. This is an excellent choice for anyone looking to establish an online presence with a professional, clean look. Although there are many CSS templates available, it is worth exploring multiple options. Free CSS templates can help you save time and money. Use the W3C's templates to create a template. The W3C templates will allow you to create templates that fit your needs. A premium version can be downloaded to your website. Each template has its own advantages and each one is worth looking at. A CSS Template is an excellent alternative to your website. This template is completely free and can be used on desktop or mobile devices. Even if you don’t know any code, a CSS template can be used to design a website. A CSS template is perfect for a basic web page. It can be used as a CSS file. It can also be used to create advanced templates. HTML5 Framework is the best choice for building websites because it's flexible and can be used across a variety of applications.
0 notes